Help Center
Print
How to create/manage the driver
Creating and managing driver accounts is a crucial step in efficiently handling your fleet. This guide explains how to add, edit, and manage drivers in the Taxi Dispatch System.
Steps to Create a New Driver
Step 1: Access the Drivers Page
- Navigate to the “Drivers” option in the application menu.
- The Drivers page displays a comprehensive list of all registered drivers.
Step 2: Add a New Driver
- Click the “ADD NEW DRIVER” button located at the top-right corner of the page (Fig. 1).
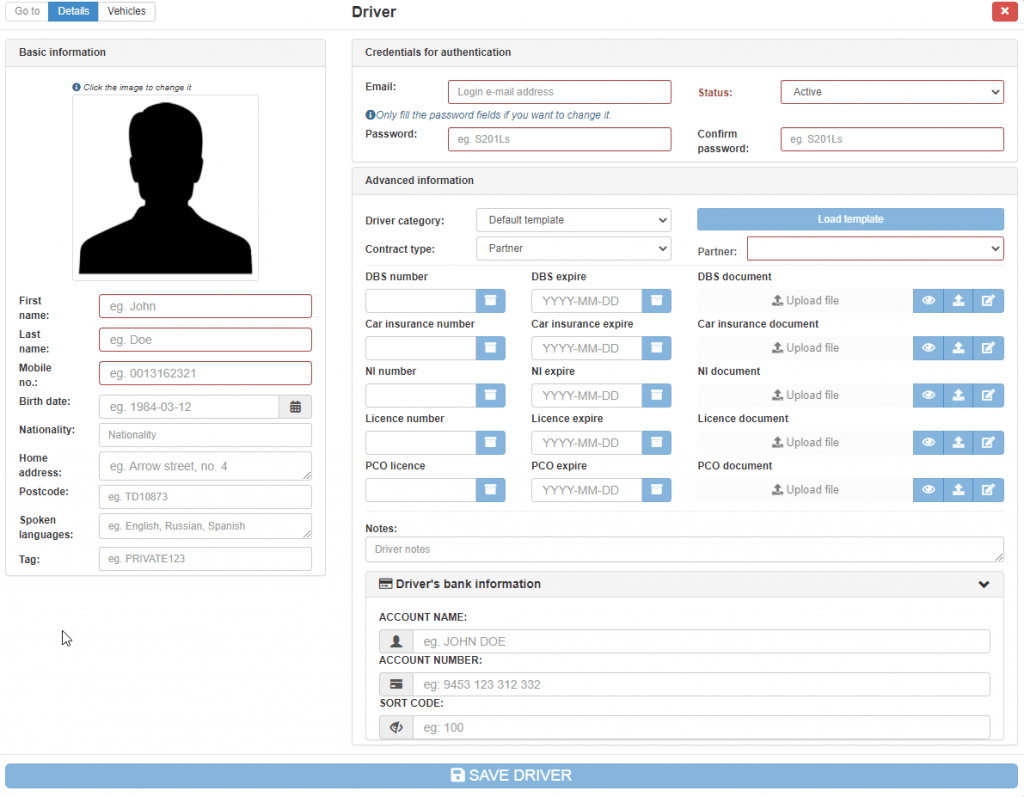
- A pop-up window will appear containing input fields for the new driver (Fig. 2).
- Fields with a red border are mandatory and must be completed.
Step 3: Complete Driver Information
- The driver details window is divided into three sections:
- Basic Information: Include details such as name, phone number, and email.
- Advanced Information:
- Select a template from the Driver Category drop-down menu.
- Click the “Load Template” button to generate additional fields.
- Fill out details related to the driver’s documents, such as licenses, insurance, and expiration dates.
- Upload documents directly from your computer.
- Credentials for Authentication: Assign login credentials, including username and password.
Step 4: Save the Driver
- Once all required fields are completed, click the “SAVE DRIVER” button to finalize the entry.
- The new driver will now appear in the Drivers List.
Step 5: Edit or Delete a Driver
- Use the search filters to locate the driver in the list.
- Navigate to the Actions column, where you’ll find buttons to:
- Edit: Update the driver’s information or upload new documents.
- Delete: Remove the driver from the system (Fig. 3).
- Hover over the buttons to see their functions.
Key Features of Driver Management
- Customizable Details: Tailor driver profiles with advanced information and document uploads.
- Template-Based Configuration: Use templates to streamline input fields for document management.
- Centralized Control: Easily edit, delete, or manage drivers using filters and the actions column.
Figures and Illustrations
- Fig. 1: Accessing the “ADD NEW DRIVER” button.
- Fig. 2: Completing basic, advanced, and credential fields in the driver details window.
- Fig. 3: Editing or deleting drivers using the actions column.

