Help Center
Print
How to manage vehicles assignments to drivers
Assigning vehicles to drivers is an essential process for managing your fleet efficiently. This guide explains how to assign, edit, and manage vehicle assignments for drivers in the Backoffice application.
Steps to Assign a Vehicle to a Driver
Step 1: Access the Drivers Page
- Navigate to the “Drivers” option in the main menu.
- The Drivers page displays a list of all registered drivers.
- Check the “CARS” column to identify drivers without assigned vehicles (Fig. 1).
Step 2: Open the Driver’s Profile
- Select the driver you want to assign a vehicle to by:
- Double-clicking their row in the list.
- Clicking the “Manage this driver” button in the Actions column.
Step 3: Navigate to the Vehicles Section
- The driver’s profile page has two sections:
- Details: Displays driver information (default view).
- Vehicles: Displays the driver’s vehicle history.
- Click the “Vehicles” button at the top of the profile page (Fig. 2).
Step 4: Assign a Vehicle to the Driver
- In the Vehicles section, click the “Assign a vehicle to the driver” button.
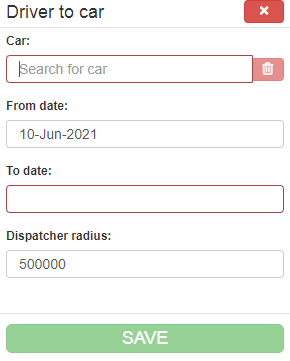
- A pop-up window will appear (Fig. 3).
- Complete the following fields:
- Select Car: Choose the vehicle to assign to the driver.
- Timeframe: Define the start and end dates for the assignment.
- Click the “SAVE” button to confirm the assignment.
Step 5: Manage Vehicle Assignments
- The assigned vehicle will now appear in the driver’s vehicle list.
- To edit or delete an assignment:
- Use the buttons in the Actions column (Fig. 4).
Key Features of Vehicle Assignments
- Clear Identification: Easily identify drivers without assigned vehicles using the “CARS” column.
- Assignment History: View all past and current vehicle assignments for each driver.
- Custom Timeframes: Define specific periods for vehicle assignments to manage temporary or shared use.
Figures and Illustrations
- Fig. 1: Drivers page showing the “CARS” and “ACTIONS” columns.
- Fig. 2: Accessing the Vehicles section in the driver’s profile.
- Fig. 3: Assigning a vehicle to a driver using the pop-up window.
- Fig. 4: Managing vehicle assignments in the driver’s list.


