Help Center
Print
How to create/manage the price plot zones
Organize and optimize your company’s activities by creating and managing Plot Zones. This guide explains how to configure plot zones using the Backoffice application.
Steps to Manage Plot Zones
Step 1: Access the Plot Zones Page
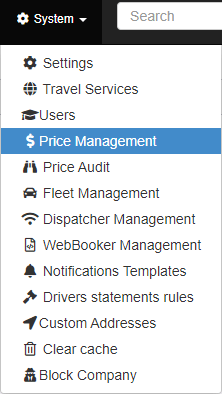
- Navigate to “System → Price Management” (Fig. 1).
- Click on the “Plot Zones” option in the page sub-menu (Fig. 2).
- The Plot Zones page is divided into two main areas:
- Zones List: Displays a list of all existing plot zones.
- Zones on Map: Visually represents the plot zones on the map.
Step 2: Create a New Plot Zone
- Click the “Start to Draw” button located at the top-middle of the map area.
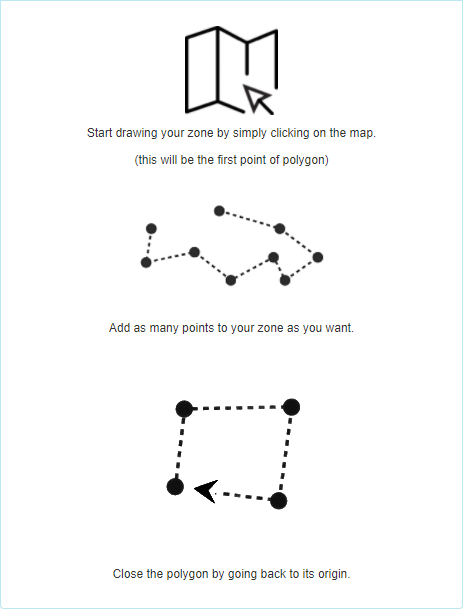
- Follow the drawing instructions displayed on the left of the page (Fig. 3):
- Use the map to define the boundaries of the new plot zone.
- Close the plot zone to complete the drawing.
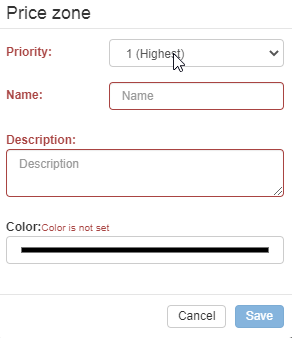
- A configuration window will appear, allowing you to:
- Set Priority: Define the zone’s priority level.
- Name and Describe: Provide a unique name and description for the zone.
- Once all fields are complete, click the “Save” button (Fig. 4).
- The new plot zone will now appear on the map.
Step 3: Edit or Delete Existing Plot Zones
- Locate the plot zone in the Zones List.
- Use the buttons in the “Actions” column to:
- Edit: Update the zone’s configuration or boundaries.
- Delete: Remove the plot zone from the system.
- Hover over each button to view its functionality.
Key Features of Plot Zone Management
- Interactive Map Interface: Easily create and modify plot zones using a visual map.
- Customizable Settings: Set priorities, names, and descriptions for better organization.
- Flexible Management: Edit or delete plot zones as needed to adapt to operational changes.
Figures and Illustrations
- Fig. 1: Accessing the Price Management option in the System menu.
- Fig. 2: Opening the Plot Zones page.
- Fig. 3: Drawing instructions for creating a new plot zone.
- Fig. 4: Configuring plot zone inputs.


