Help Center
Print
eBooker applications
The eBooker Application is a flexible tool that allows users to create bookings seamlessly while providing customization options tailored to customer needs. This guide explains how to configure, implement, and use eBooker applications effectively.
Key Features of the eBooker Application
- Customizable Configurations: Adjust settings to match customer requirements, including travel services, car types, and payment methods.
- Website Integration: Easily implement the eBooker on your website with iframe links and floating positioning options.
- User-Friendly Versions: Choose between the single-page Alpha version or the step-based Omega version for a tailored booking experience.
Key Benefits of eBooker Management
- Flexible Integration: Configure settings for both website and app use.
- Enhanced User Experience: Choose between simplified or step-by-step booking workflows.
- Custom Features: Add extra fields, mandatory fields, and privacy policies to match specific requirements.
Steps to Manage eBooker Applications
Step 1: Access the WebBooker Management Page
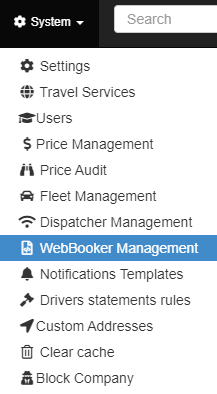
- Navigate to “System → WebBooker Management” from the menu (Fig. 1).
- Use the WebBooker Management page menu to navigate through existing web bookers or create a new one (Fig. 2).
Step 2: Configure a New eBooker
- Click the “ADD NEW EBOOKER” button to open the configuration window.
- Complete the settings using the following options:
Standard Configuration Settings:
- Select available travel services and set a default service.
- Configure car types, extra fields, and extra charges for each travel service.
- Choose supported payment methods.
- Set up an auto-login user for the application.
Advanced Configuration Settings:
- Add terms & conditions and privacy policy checkboxes above the “Confirm Booking” button.
- Position the web booker (float left, float right, or no float).
- Set the default language for the web booker.
- Hide the “Register” and “Sign in” menus, if needed.
- Disable the “Return Booking” option.
- Make drop-off address and passenger data mandatory.
- Add new fields like driver tip, baby seats, and luggage options.
Step 3: Save and Launch the eBooker
- Once configured, click the “Save Booker” button to finalize the setup.
- Use the “Copy URL” button to obtain the eBooker link. Paste it into a browser to access the configured application.


eBooker Versions
eBooker v.1 (Alpha):
- Compact and Single-Paged:
- Interface is similar to the Dispatcher page in the Backoffice application.
- Input booking details and click “Confirm Booking” to complete the process.
- A success message will confirm the booking.
eBooker v.2 (Omega):
- Three-Step Booking Process:
- Choose Route:
- Add pick-up and drop-off points.
- Include Stops on the Way (SOTW), set pick-up time, specify passenger and child seat numbers, and input a voucher code or return booking.
- Select Price:
- View car types and prices.
- Add luggage numbers and vehicle count, then click “BOOK NOW.”
- Book:
- Add passenger details, select a payment method, and click “CONFIRM BOOKING.”
- A success message will confirm the booking is registered.
- Choose Route: