Help Center
Print
How to create vouchers
Step 1: Access the Vouchers Page
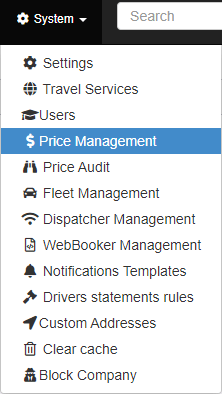
- Navigate to “System → Price Management” in the Backoffice application (Fig. 1).
- Select the “Voucher” option from the page’s sub-menu (Fig. 2).
- The Voucher page displays a list of all vouchers issued by the company.
Step 2: Create a New Voucher
- Click the “ADD NEW VOUCHER” button located at the top-right of the page (Fig. 3).
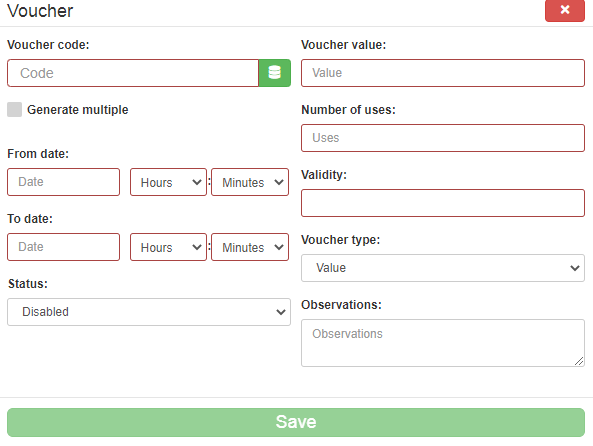
- A pop-up window will appear, requiring you to complete the following fields (Fig. 4):
- Voucher Code: Enter a unique code for the voucher.
- Value: Specify the discount amount or percentage.
- Type of Value: Choose between a fixed amount or percentage.
- Timeframe: Define the active period for the voucher.
- Number of Uses: Set the number of times the voucher can be redeemed.
- Validity Before Booking: Specify how far in advance the voucher must be applied.
- Status: Choose the voucher’s activation status (active or inactive).
- Once all information is filled out, click the “Save” button to create the voucher.
Step 3: Edit or Delete Existing Vouchers
- Locate the voucher in the list.
- Use the buttons in the “Actions” column to:
- Edit: Update the voucher details, including code, value, or validity.
- Delete: Remove the voucher from the system.
Key Features of Voucher Management
- Customizable Options: Create vouchers with flexible settings such as value, type, and usage limits.
- Centralized Management: View all issued vouchers in a single list for easy tracking.
- Marketing Benefits: Use vouchers to incentivize bookings and attract new customers.
Figures and Illustrations
- Fig. 1: Accessing the Price Management option in the System menu.
- Fig. 2: Opening the Voucher sub-menu.
- Fig. 3: Adding a new voucher via the “ADD NEW VOUCHER” button.
- Fig. 4: Filling out voucher details in the new voucher window.


