Help Center
Print
Kiosk applications
Kiosk applications are simplified tools designed to facilitate quick bookings. These apps can be installed at strategic locations or accessed via mobile devices (phones or tablets). This guide explains how to configure and manage Kiosk applications using the Backoffice application.
Key Features of Kiosk Applications
- Quick Booking: Designed for fast and efficient booking processes.
- Multi-Platform Access: Accessible via kiosks, phones, or tablets.
- Customizable Settings: Configure versions to match your business workflow.
- Straightforward Payment Options: Options vary between app versions for flexible user experience.
Steps to Manage Kiosk Applications
Step 1: Access the Kiosk Management Panel
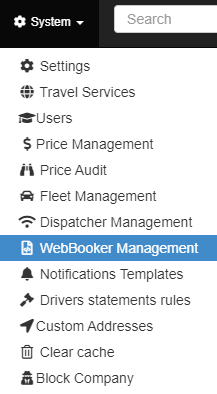
- Navigate to “System → WebBooker Management” in the Backoffice application (Fig. 1).
- Use the WebBooker Management Menu to select the Kiosk version you want to configure (Fig. 2).
Step 2: Create a New Kiosk Application
- Click the “ADD NEW KIOSK / KIOSK V2 APPLICATION” button at the top-right of the page.
- A configuration window will appear, allowing you to customize the application settings.
- Configure the application based on the chosen version (detailed below).


Differences Between Kiosk V.1 and V.2
Kiosk V.1 (Alpha)
- Features:
- Designed for speed and simplicity.
- Payments are made directly to the driver, not through the kiosk.
- No payment method configuration is needed.
- Booking Process:
- Step 1: Select pick-up and drop-off points, number of passengers, number of cars, and car type.
- Step 2: Choose the car type by clicking the “BOOK NOW” button (Fig. 3).
- Step 3: Set the date and time of the booking or choose the ASAP option (configured in settings).
- Step 4: Fill in passenger details and click “ORDER NOW.”
- A “Success” message will confirm the booking is registered.

Kiosk V.2 (Omega)
- Features:
- Allows payment to be made directly through the kiosk.
- Configure payment methods and set a time interval for completing transactions.
- Booking Process:
- Step 1: CHOOSE ROUTE/SELECT CAR
- Select pick-up and drop-off points, number of passengers, and car type.
- Click the “BOOK NOW” button to proceed.
- Step 2: BOOK
- Enter passenger details and select the payment method.
- Add payment details if required.
- Click “CONTINUE TO PAYMENT.”
- Complete the payment within the configured time interval.
- Step 1: CHOOSE ROUTE/SELECT CAR
Benefits of Managing Kiosk Applications
- Enhanced User Experience: Simplified interfaces for quick and easy booking.
- Flexible Configuration: Choose between two versions to suit different use cases.
- Streamlined Operations: Enable fast bookings with minimal user input.
Figures and Illustrations
- Fig. 1: Accessing the WebBooker Management option.
- Fig. 2: Navigating the WebBooker Management Menu.
- Fig. 3: Booking a ride using the “BOOK NOW” button.