Help Center
Print
How to manage invoices history
How to Manage Invoices History in the Application
Easily handle your invoices and statements with the Invoices & Statements History feature. This guide provides step-by-step instructions to access, view, and manage your invoices efficiently.
Step 1: Access Invoices & Statements History
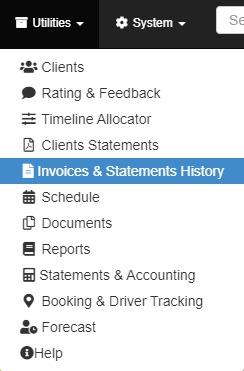
- Navigate to the “Invoices & Statements History” option in the “Utilities” sub-menu (Fig. 1).
- The page displays a comprehensive list of invoices, complete with filters to help you refine your search.
Step 2: Understand the Invoice Status Legend
Invoices are color-coded to indicate their payment status (Fig. 2):
- Green: Paid invoices.
- Red: Overdue invoices.
- Yellow: Pending invoices.
Step 3: Explore Invoice Categories
The page is organized into three main categories, each with its own list (Fig. 3):
- Driver Invoice: Invoices related to driver transactions.
- Client Invoice: Invoices issued to clients.
- Company Invoice: Internal company invoices.
Step 4: Perform Actions on Invoices
Each invoice in the list includes four buttons under the “Actions” column:
- View: Open and review the invoice details.
- Alternatively, double-click the list item to view the invoice.
- View Invoice Logs: Access a detailed history of all actions performed on the invoice.
- Download: Save a copy of the invoice to your local device.
- Delete: Remove the invoice from the system.
Key Features of the Invoices & Statements History Page
- Comprehensive Filters: Refine searches to quickly locate specific invoices.
- Visual Indicators: Color-coded statuses for quick payment status identification.
- Detailed Logs: Review action histories for transparency and accountability.
- Category Organization: Separate lists for drivers, clients, and company invoices for easy navigation.
Figures and Illustrations
- Fig. 1: Accessing the Invoices & Statements History option.
- Fig. 2: Invoice status legend for quick reference.
- Fig. 3: Categories of invoices and their respective lists.


