Help Center
Print
How to manage accounts
Easily create, edit, and manage accounts used to access the Backoffice application. Follow this guide to learn the step-by-step process for account management.
Step 1: Access the Accounts Management Page
- Log in to the Backoffice application.
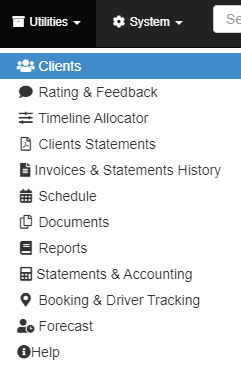
- Navigate to the “CLIENTS” option under the “UTILITIES” sub-menu (Fig. 2).
- Click on the “ACCOUNTS” option in the page’s sub-menu (Fig. 3).
- The “ACCOUNTS” page will display a list of all registered accounts in the system.
Step 2: Add a New Account
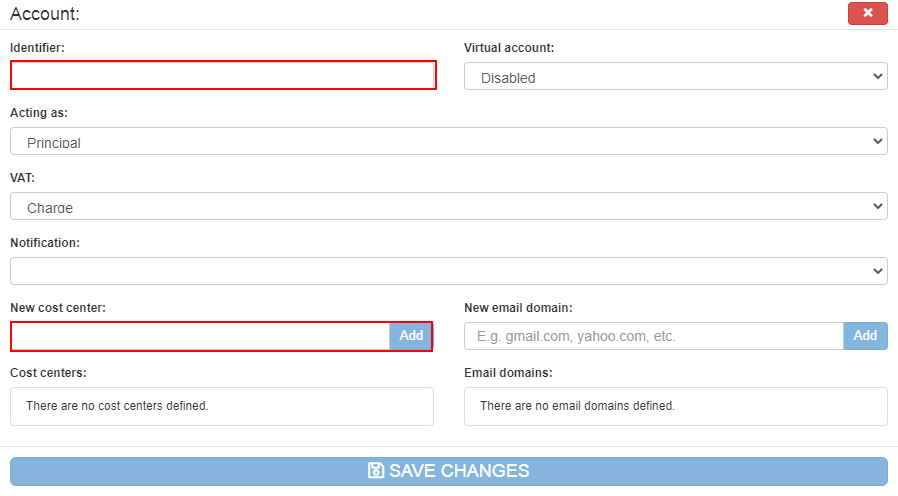
- Click the “ADD NEW ACCOUNT” button to open the account creation window (Fig. 4).
- Complete the required fields:
- Identifier: The account name displayed in the Name column of the list.
- Cost Center: Specify a subdivision of the company (e.g., a department). Add multiple cost centers as needed.
- Company Field: This is auto-filled with the company you are currently signed into.
- After filling in the details, click “SAVE CHANGES” to create the new account.
- The new account will now appear in the list.
Step 3: Edit or Delete Accounts
- Locate the account in the list.
- Use the buttons in the “Actions” column to:
- Edit: Modify account details.
- Delete: Remove an account from the system.
- Note: Hover over the action buttons to view their functionalities.
Key Features of the Accounts Management Page
- Comprehensive Overview: View all registered accounts in a single list.
- Easy Account Creation: Add accounts with customized identifiers and cost centers.
- Flexible Management: Quickly edit or delete accounts as needed.
Figures and Illustrations
- Fig. 1: Current account display in the top-right menu.
- Fig. 2: Accessing the Clients option in the Utilities sub-menu.
- Fig. 3: Navigating to the Accounts option.
- Fig. 4: Account creation window with input fields.


