Help Center
Print
How to manage backoffice users
Managing user accounts in the Backoffice application is a simple process. This guide explains how to add, edit, and manage user accounts efficiently.
Steps to Manage Backoffice Users
Step 1: Access the Users Page
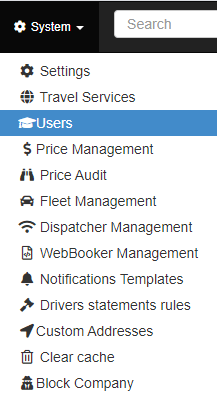
- Navigate to the “Users” option in the “System” sub-menu (Fig. 1).
- The Users page displays:
- A list of all registered users.
- Filters to refine your search by criteria such as status or role.
Step 2: Add a New User
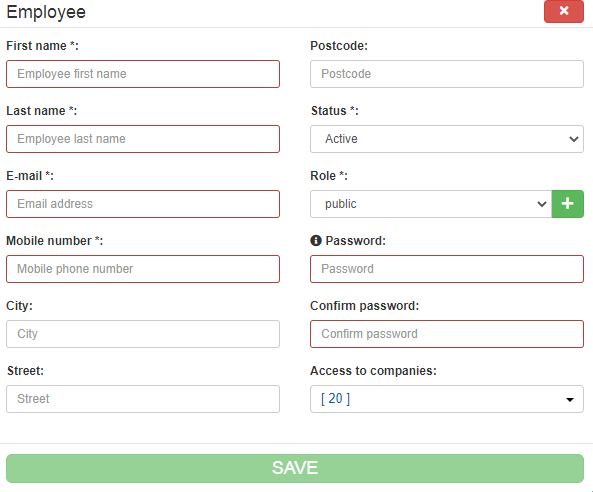
- Click the “ADD NEW USER” button to open the user creation window (Fig. 2).
- Fill in the required fields (marked with a red border):
- Mandatory Fields: These are the minimum details required to save the account.
- Optionally, complete additional fields for a more detailed account setup:
- Address Information: City, street, and postcode.
- Account Status: Choose between Active, Pending, or Inactive.
- User Role: Assign roles such as Public, Manager, Operator, etc.
- Company Access: Specify the companies linked to the account.
- Click the “SAVE” button to create the user account.
Step 3: Locate and Manage User Accounts
- Newly created accounts will appear in the list, categorized by their assigned status.
- Use the Status Filter (Fig. 3) to find users based on their status:
- Active: Accounts currently in use.
- Pending: Accounts awaiting confirmation or activation.
- Inactive: Disabled accounts.
Step 4: Edit or Update User Accounts
- Use the buttons in the “Actions” column to:
- Edit user information.
- Change account status.
- Hover over each button to view its functionality.
Understanding User Statuses
- Active: The account is fully operational.
- Pending: The account is awaiting activation or deactivation.
- Use the “Activate User” or “Deactivate User” buttons to assign a definitive status.
- Inactive: The account is disabled and cannot be used.
Key Features of Backoffice User Management
- Advanced Filtering: Refine searches using filters for status, role, or company.
- Customizable Roles: Assign specific roles to users for tailored permissions.
- Pending Status Flexibility: Use Pending status for accounts requiring confirmation before activation.
- Comprehensive Account Details: Include additional information such as address, company access, and role for detailed account profiles.
Figures and Illustrations
- Fig. 1: Accessing the Users page via the “Users” option.
- Fig. 2: Creating a new user account in the user data window.
- Fig. 3: Filtering users by status using the Status Filter.


